Check out my Pages

Monday, December 22, 2014

Simplicity 1692 in navy silk charmeuse

     Inspiration for sewing something new can come in many shapes and sizes. Way back when, I received a present, a  beautiful pair of earrings ...........however, I really didn't have anything to wear with them until now.   check them out: 

Inspiration: Earrings


    About a year ago, Fabric Mart had a wonderful silk sale and I was awe struck when I saw this beautiful navy silk charmeuse.  Yes, this would be the fabric to sew up Simplicity pattern 1692 and would match my beautiful earrings...so I ordered 2 1/2 yards.
Sewed View A


      Fabric:  2  1/2 yards from Fabric Mart at $8. a yard.  I hand washed this fabric and then air dried it.  Also, I used matching Gutermann silk thread, about 220 yards. 

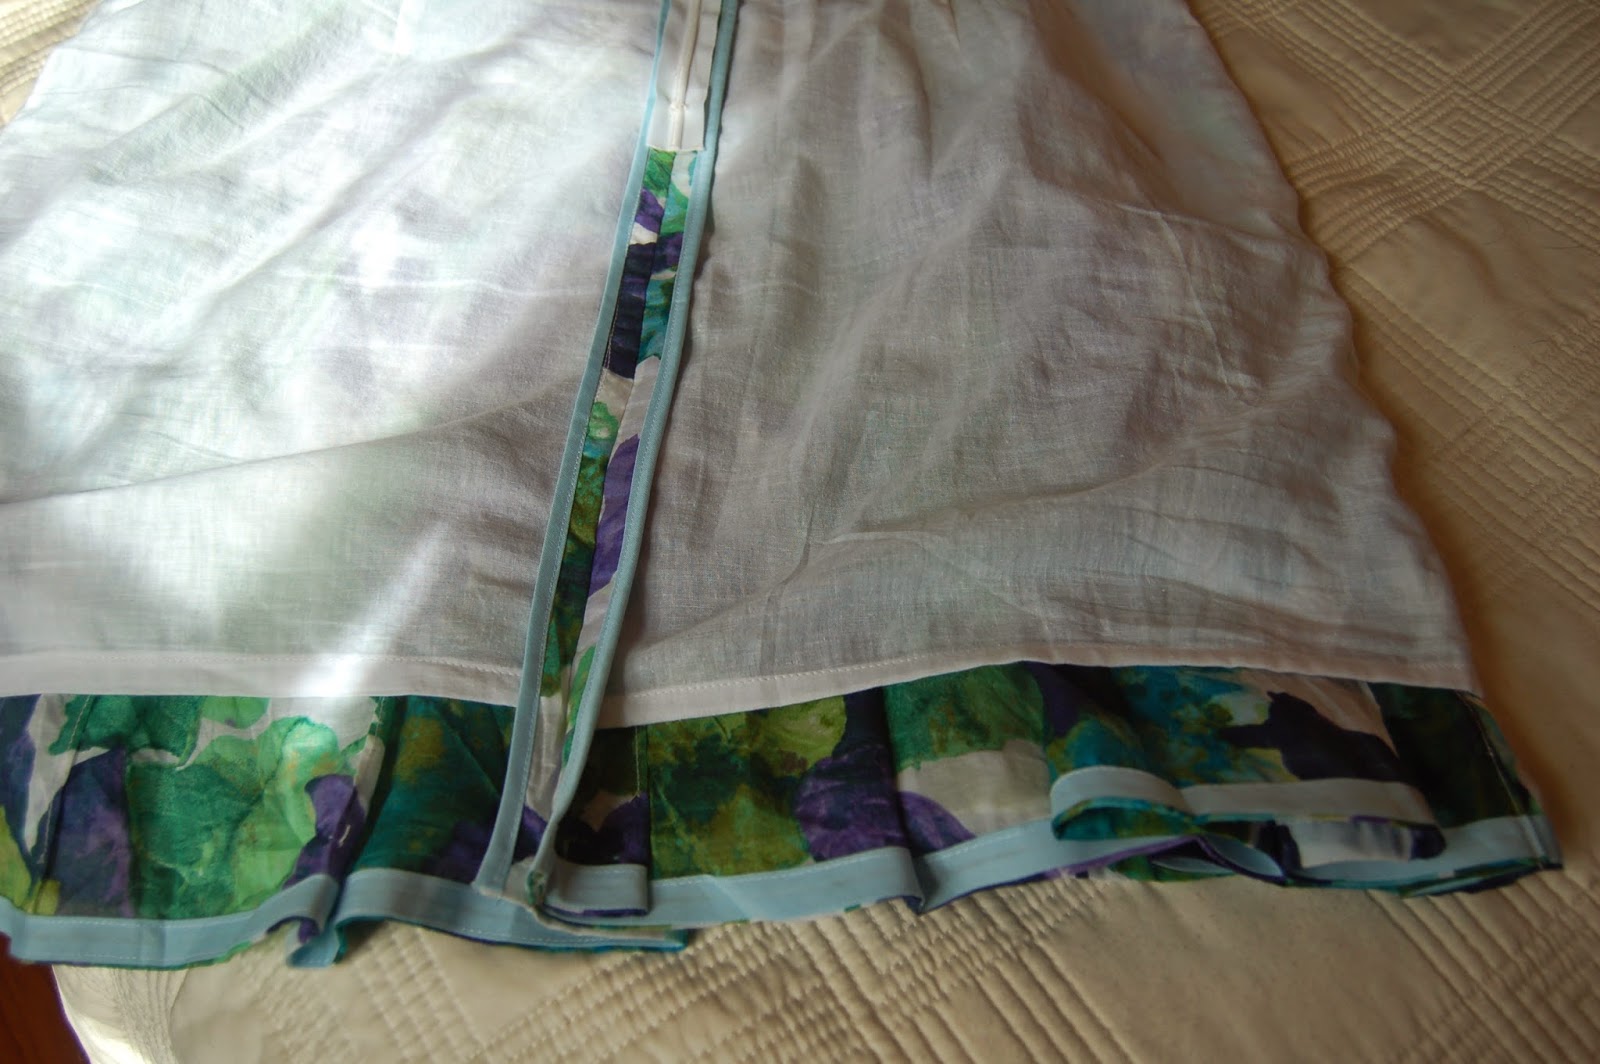
       Notions:  Five 1/2" buttons.  I made black bemberg bias tape for the zipper seams and the back placket.  Purchased one pack of single fold bias tape for the hem.  Also, used stay tape for the shoulder seams and zipper seams. I have a set of shoulder pads but I did not sew them in. Oh, a little pellon interfacing for the cuffs.

      Pattern Adjustments:  I did sew up a couple of muslin tests. (However, I did forget to sew up the muslin with the shoulder pads...my bad) Adjustments made: shortening the sleeves (typical for me) lengthening the torso about 1 1/2"(typical for me) , upper arm adjustment (typical for me) . Added 1/4" more to the hips.  I wish I had added a little to the back sleeve for a back adjustment, next time. 

      Techniques: Sewed using French seams, Hong Kong seams for zipper side and back placket. Sewed stay tape along shoulder seams and zipper seams.  Sewed bias tape to create a neat narrow hem. 

Bias tape hem, bemberg on zipper seam


     Sewing  Issues:  Charmeuse is very slippery and has a mind of its own.  I had a hard time keeping the tucks lined up vertically, they tended to wander off kilter.  I had to sew the neck binding twice.  The first time the gathers weren't centered, again the fabric moved around. Even now the left shoulder seam pulls forward a little. Otherwise, this is a straight forward pattern and wasn't terribly difficult. 

Finished Blouse S1692


     Overall:  I love this blouse even though there are a couple of small issues.  Silk charmeuse feels so good next to the skin and I love the way it shimmers when the light hits it. 
Blouse with corduroy jeans


Silk Charmeuse...so glamorous!
     

Sunday, November 30, 2014

McCalls 6902......Easy but do let me count the errors of my way


    Yes, I have been dreaming of sewing up a fall suit..........specifically a lined jacket, but nothing too fussy with a matching pencil skirt.  I already have a simple skirt pattern altered to fit, so I just needed a jacket pattern.  I was drawn to M6902 as soon as I spotted it because of its simple design and that pretty printed "easy" word.  In my mind I thought I could whip out this jacket in 2 days............ah such dreamer! 

        Easy Pattern M6902:


    First lets start with the fabric: Black and blue checked heavy linen purchased at Hancock fabrics for about $4 a yard.  I purchased 4 yards, enough for a skirt and jacket. Please note:  Even though the pattern calls for a fabric with good drape, I choose this heavy black and blue checker linen; which is a little stiff.  Something about this fabric caught my eye and I decided to go for it.  Maybe it wasn't the best choice. I think a beautiful wool suiting would have been a better choice. Live and learn.

   Lining: black bemberg from JoAnn's.  Yeah, I purchased it with a coupon so I paid something like $4 a yard.  Again, I purchased 4 yards. 

    Piping: purchased 2 packs of Wrights pre-made black piping.  The pattern suggested ribbon which is top-stitched to the pattern; however, I thought piping was a little more high end looking.

   Notions:  In my stash I had the black rose button. Even though the jacket calls for hook and eyes..........I wanted something more glamorous.  Although, I still put in a hook and eye on the inside, for extra holding power. (Should I say suck in power)


Check out my outfit: 
Jacket and matching pencil skirt


   Lets get to the heart of the matter, fitting issues, design changes and the lining.  

   Fitting:  I did make a bodice test muslin for the jacket.  (Actually 3 muslins all total)  My first mistake was not adding the sleeves to any of the muslins.  If I would have added the sleeves, I would have realized I needed a little bit more room in the back area. Second mistake: I should have added a hook and eye at the waist to the muslin so the front of the jacket would close like on the model.   Instead I kept pulling the jacket to get a good bust fit; however, each time I did that I had to increase the FBA.  I ended up increasing the FBA almost 2 inches, but later after the jacket was finished I had to take apart the lining from the jacket and decrease bust area an 1", because it was way to big. Third Mistake:  After adjusting the torso (length and shorten three times) my pattern became skewed and if you notice the closure at the waist is not straight.  Fourth Mistake: Lining the jacket. I should have used the bag method; which I found after the fact.  Instead I followed the instructions and tried to sew the sleeve lining to the sleeve jacket seam; however, I admit I am not good at it. Fifth Mistake: Design change in sleeve cap, I added a pleat.  In my mind I thought it would be a beautiful detail; however, I think it would have looked better if I used a softer drapey fabric.  Sixth Mistake:  Under-stitching the lining to the outer fabric.   Did I miss a step or miss read the instructions?  But how can you underline the jacket if you sewed the lining and jacket together all the way around?  Anyway, I ended up top stitching the jacket to lining once I turned it right side out. Final mistake:  I wish I would have added more fabric to the front center so the V shape wasn't so wide at the top.


                 More images: 


Jumping to stay warm

Cool mural on the side of a bar.

Another mural

Backside showing peplum


      Suggestions:  Keep in mind the jacket closes at the waist.  I highly suggest doing a full test muslin first before cutting into that expensive fabric.  Also, I would like to try this jacket again, but with a new pattern (since my adjusted pattern is a mess) and a drapey fabric.

     P.S. I owe a big thank you to my photographer, who not only got up early on a Sunday morning but also took photos in 35 degree weather.  Awesome! 


Wednesday, November 5, 2014

Navitat Zipline/ Blue Ridge Experience

    Sometimes you need to get out and enjoy life to know you are still alive.  For a while I have been wanting to fly through the sky on Navitat zip line or take a hot air balloon ride to see the fall "changing of the leaves".  When I presented these two options to Glenn, he immediately ruled out the hot air balloon ride, so it was a matter of "working" on him to go with me on the zip line.  I told him, he would love it.  Although, after he read the disclaimer; which needed to be signed, his hand stopped moving on the computer mouse and I had to click submit for him. So, the disclaimer mentioned something about death, and broken bones, heart attacks...blah, blah, blah.  I told Glenn, " You are more likely to die in a car accident then zip line". Seriously!

      Please note: there are a couple of different zip line options.  We choose the Blue Ridge Experience, because those particular zip lines have a self braking system, the longest zip line in the South East and Glenn said he wanted the least amount of physical activity (less hiking).  The other option is Moody Cove, which includes more hiking, rappelling, and you have to self brake. 

      Some how the universe worked in our favor and gave us a green light.  Yeah, there was snow a couple of days before we were suppose to go, but on our reservation day, the weather turned warm with sunny skies.  How awesome! 

       Once you arrive at Navitat you check in and they weigh you.  Fortunately only the lady behind the desk sees your weight and as long as you weigh under 250 you are good to go.  Next up, the instructors introduce themselves and then you are harnessed up.  Then your group is put in to a van and you are driven up a steep bumpy road to the top of a mountain.  The van ride really was more like a carnival ride with bucket seats.  After enjoying the view at the top of the mountain, you are then led up a narrow path to where you reach the first platform. 

      Check out the instruction photo:  I am in the back looking spastic and Glenn looks concerned.   It is do or die at this point: 


        This is what it looks like while on the zip line:


       This is what it looks like when you leave the platform (looking back): 


     Check out this incredible view:


        Here we are ready for our final run.   At this point we feel like professionals and are a little sad that this is going to be the last run. 


  If ya'll get a chance to  visit Asheville, definitely check out the Navitat zip line...........it is so worth the effort and cost. Also, I should mention the instructors were hilarious, and professional.

Monday, October 13, 2014

White Clipped Silk Cotton Voile in McCalls 6650

  Silk Cotton Voile is a dream to cut and sew............and is at the top of my list for most favorite fabrics.  It presses beautifully and feels great next to the skin.   In addition, I feel for clothing it is very "office" friendly.  

    Recently, I completed (another) McCalls 6650 using a white clipped and light blue teal silk cotton voile.  Then using Butterick 4989, I  sewed up a matching blue batiste camisole to wear underneath, and to complete the look I sewed up a winter white worsted wool pencil skirt underlined with Bemberg lining.   Check out my latest fall or spring look: 
Pretty blouse and comfy skirt


 Blouse fabric:  silk cotton voile, purchased earlier this year at Mary Jo's in Gastonia, NC.  Purchased 2 yards at $24 per yard or something like that. 
 Camisole fabric: batiste, purchased a yard around $3.00 on sale at Mary Jo's.  
Pencil skirt fabric:  St. John's worsted wool, purchased one yard at $34. Purchased from House of Fabrics in Asheville.  2 yards of a cream Bemberg lining purchased at Jo Ann fabrics for about $4.50 a yard.  I used a 50% off coupon, otherwise it would be like $8.99 a yard. Fortunately I didn't have to order via internet, and my local Jo Ann fabrics keeps black and cream in stock!

Changes I made to sew up blouse:  I used a clear snap in the back of the blouse instead of a hook and eye.  In addition, I hand sewed in silk organza for an interfacing. Sewed using French Seams, and used bias tape on the hem to make a neat finish.
bias tape for hem...makes a neat finish on the inside 


Time frame:  It took me a couple of days to sew, but could have been sewed in a day once the pattern was adjusted. 

Camisole:  no changes made to the pattern. It only took a couple of hours to sew up. (yah)
matching camisole using pattern Butterick 4989


Winter White skirt:  I have a "go to" pencil skirt pattern.  I did make the skirt an 1" longer then my standard.  Also, for a closure,  I sewed two loops into the waist facing which goes around two beautiful buttons, above the zipper. Also, I underlined the wool with Bemberg lining.  Hong Kong seams, and for hem I sewed bias tape around rough edges then turned up and used a catch stitch. 
This skirt took about three days to sew up.......of course I made sure to hang up my skirt before hemming. 


button loop closures instead of hook and eye

Catch Stitch for hem, Hong Kong Seams


I like rainy days

Next up: a heavy navy and black checked linen suit lined with black Bemberg lining............but you know I will go back to McCalls 6650 but sew up a different view.  I love this blouse pattern!


Wednesday, September 17, 2014

McCall's 6650/ View C easy work blouse

    This (wearable muslin) blouse has been waiting on me to get photographed for a second try.  Yes, the first photos were awful so I retook them and all in all I think the photos came out well.  Check it out:
Check out that breeze action!


    Even though I did a test run with some scrap fabrics, I wanted to make sure I got the proper fit before cutting into my (real fabric) a sheer silk cotton clipped voile.  Yeah, a few months back my Mom and I went to MaryJo's in Gastonia, NC and I purchased this gorgeous fabric there. Check out the fabric: 


Love this fabric 
       Wearable Muslin Fabric:  an "everyday deal" poly charmeuse  fabric from Hancock fabrics. I think I paid something like $3 a yard.  The blouse took 2 yards. As a side note: I must mention that due to the lack of quality in the fabric, it frayed faster then I could sew up.  Also, it was super slippery and went off the grain a little bit.  I really should have mirrored the front and back panel patterns, so I wouldn't have to cut it on the fold.  Oh well, live and learn.


trying to show slit in skirt


     Techniques:  I sewed up using French Seams.  Also, I did use bias tape for the hem to give a clean neat finish.  Check it out: 


bias hem for a neat finish 

     Sewing Issues:  I was a little confused at first by the placket but after making the first test run with scrap fabric, I felt comfortable sewing it up again. Also, the shoulders were a little large and had to be cut down. I did find the waist was way too large and tapered down 2 sizes smaller, creating more of an hour glass shape instead of the boxy shape of the pattern.  Of course, I did have to make an upper arm adjustment; which I thought was weird because the rest of the pattern was so large.  Also, I shortened the sleeves by an 1" too.   Normally I have to lengthen the torso, but not in this case.  


     Time:  A few days to sew up once I adjusted the pattern pieces. 

     Over all View C is easy to sew up once you get the fit you want.  


     Lastly, I sewed up Simplicity 5259 (skirt) in a black cotton twill.  I underlined the skirt with black bemberg.  Yeah, I hand basted the rayon to the twill, then sewed up following directions.  Changes: I added a silver exposed zipper and made a high waisted facing.   Purchased bias tape for the Hong Kong seams.  I love the front slit on this skirt.........and the cotton twill is very comfortable.  


      Fabric: cotton twill and for underlining Black Bemberg


inside zipper and finished seams


      Techniques: Hong Kong seams.   Hand basted lining to cotton twill then sewed up normally. Exposed silver zipper. 

       Time: A few days.  Pretty easy once I got the correct fit with the changes I made to the original pattern.  


Finished outfit


    I have already started to sew up the silk cotton voile blouse and am looking forward to wearing it............and showing it off!

Happy sewing.


Tuesday, September 2, 2014

New Living Room Drapes in a beautiful Vienna Flower print

......And I am back.  Yeah, work seriously got in the way of my fun.  Moving forward, I finished sewing up some new drapes for our living room. It only took a year to do too! 
New Living Room Drapes


      Well, I purchased the fabric last year when Hancock fabrics had a phenomenal sale....it was 50% off decorator fabric with an extra 10% coupon.  I love when that happens.  The fabric retailed for $29.99 a yard, and I purchased 8 yards, so with the coupon I ended up paying something like $100 total.  Also, I invested in 8 packages of pre-made bias tape; which I sewed and understitched to each side of the curtain panel.  I really wanted these drapes to look professional and have a finished neat look. (AND they do!)
Check out the bias tape and hem


    Fabric:  100% linen Vienna Flower print fabric.  Now our picture window is way wide, something like 110" wide, and the fabric was only 55" wide, so I ended up having to french seam extra fabric to each panel so the curtain panels would close in the center.  I don't think it is too noticeable. Check out the fabric:
100% linen Vienna Flower Print


    Time:  Well, it didn't take a year to sew.....that is when I purchased the fabric.  Prepping and sewing time was about 20 hours. Most of that time was spent sewing  down the bias tape and understitching.  It was time consuming but not hard to do. Of course, there was lots of ironing.  In addition, I purchased "Best Press" in lavender.  I love the scent when ironing but my skin didn't like it.  Yeah, it totally irritated my hands.  Oh how we seamstresses suffer! 

    Fabric care:  Ok so the label says: Dry Clean Only.   Glenn and I didn't need these drapes to look formal, so I threw the fabric in the washer and set the machine on cold delicate............and it came out fine.  Then I stuck them in the dryer....yep I did that too.   So, the fabric isn't as stiff, but for us it is fine. 

   Techniques:  I did rip these on the cross grain to keep the fabric straight, but it did take some muscle effort. French seamed half of a width of fabric to a full width to make wider.  Sewed bias tape to inside of each seam for a neat finish.  Created a 2 inch hem and sewed on my machine a blind hem stitch using blind hem foot. Oh, on the top I wrapped the fabric with a whitish bias tape to incorporate some white into the drapes to match our living room.  Also, I sewed up 5 box pleats at the top of the drapes where the curtain clips hold them. Check it out: 
white bias tape at top


   Lastly, I didn't sew up the sheers.  I couldn't find the correct fabric, yet at Bed Bath and Beyond I was thrilled when I spotted the sheers hanging on a display......it was exactly what I was looking for.  I put those in my cart and off I went. 

   Glenn payed me the best compliment, he said," Now we have a grown up living room." 

    I am so looking forward to more sewing. 


Monday, May 26, 2014

Flirty Simplicity 1587

   With no time to spare...... I was able to sew up Simplicity 1587 for Sunday's wedding celebration.  I love this cool, comfortable cotton swiss dot dress.  It is so cute. Check it out: 
Flirty Simplicity 1587


   Fabric:  100% Cotton swiss dot .  I didn't underline or line....instead I opted to wear a skirt slip underneath the dress, to save time.


  Total cost to make: $30.  Time frame: I sewed up two bodice muslins; which took a couple of days, but once I decided on the correct size I sewed the dress up in my spare time within 4 days. 


  Technique:  Sewed using french seams.  Sewed stay tape to each zipper seam and the base of the front yoke for extra stability. Purchased lavender bias tape for bound seams along zipper and for hemming the skirt and sleeves. Yes, I love bias tape for small hems, cause it is so neat and pretty.   Check it out: 

bias tape for hem and bound zipper seam


bias tape for sleeve hem

     Sewing Issues:  The main sewing issue that I encountered with this pattern had to do with sewing the front skirt to the front yoke.  I think if I was sewing the standard way with right sides together I wouldn't have had any issues; however, I wanted the dress in french seams, so I had a hard time lining up the dots, and the gathers look weird in that spot.  oh well, that was my bad.  Also, the loop pattern piece, was very difficult to turn right side out, even with a loop turner. A small complaint that I have about the instructions have to do with the seams of the front pleating in the neckline.  After completing the dress I realized that no where did Simplicity mention finishing those seams......so I used my  over lock function on my machine.  I did hang my dress over night and the front skirt dropped longer then the back.  So, I did end up having to cut the front skirt about a 1/2" shorter to try to even it out.  I think it is still a little off, but my photographer said it wasn't noticeable.  However, after looking at the photos I think it is. Eventually when I get a dress form, I will be better equipped to deal with hems, but for now, I do the best I can. 


    Alterations:  Instead of the 1 1/4" hem for sleeve, I went with a small 5/8" hem.  Lengthened the torso 1" .  Went up two sizes for sleeve, cause there is not a lot of ease.  Also, the pattern calls for a 16" invisible zipper; however, Hancock fabrics only had a 14".....so I purchased it and hoped for the best.  It worked out beautifully. 
bias tape on back facing
  
  Bow:  Originally I wasn't sure about adding the bow to the neckline. However, after laying some  buttons on top of the knot, I realized there was a lot going on with the print, and opted for the bow.  So glad I did...I love the bow. 
bow detail


  Thoughts:   I love this flirty dress.  There are some great details, like the sleeves.  I totally can see me sewing one up in a solid color fabric and adding the two buttons. Oh, next time I wear this dress I will make sure to button the back; which I forgot to do cause I was in a rush to get out the door! (Yeah, that is what is flapping at the back neckline) 

sleeve detail


  Next up: A black cotton twill front slit skirt with exposed zipper.  Fabric and underlining is cut, just need to get to hand basting them together. 

  Hope everyone has a great Memorial Day! 

Monday, May 19, 2014

Muslin test for Simplicity 1587 & Frying Pan Tower

   Glenn and I are invited to attend a wedding celebration on the 25th.  Of course I need to sew up a new dress for the event.......but I wasn't sure which pattern to sew up, and what fabric to use.  The event will be outdoors in a courtyard and it has been difficult to tell what the weather will do here.  Recently we went from summer weather, to rain, to a cold front which went to just above freezing at night.  So, I decided on this fabric from Hancock Fabrics: a cotton swiss dot print.  Worse case scenario I can always were a light sweater over it if the weather turns cool again.

Beautiful Swiss Dot cotton 

  Now for the pattern.  I love this Simplicity (reproduction) vintage pattern 1587.  Check it out:


    Usually I give myself two weeks to sew up a new dress but I had a wonderful surprise visit from my parents, (photos down below) which leaves me with less then a week.  Already I have sewed up my first bodice test muslin, and since I was in between sizes I went with the smaller size thinking I could add a FBA.   After a long debate in my mind, I don't think I can add a FBA, cause it may warp the pattern, so looks like I am heading back to Hancock to purchase another pattern; which I hope they have, and cut out the larger size.  I hope this isn't the beginning of more issues to come. 


   On a happier note:  Check out the photos of my Dad and me.  A little back story: my Mom suggested that my Dad and I go hiking on the Blue Ridge parkway for some bonding time.  There were some restrictions, we couldn't go to far cause of time restraints, and my Mom suggested an easy hiking trail, and I didn't have time to get a map.  Well, the long and short of it, after taking my Dad on an easy trail, he kept asking me where we were going and was there a view.  Of course my answers were I have no idea. As luck would have it a fellow hiker came by and he suggested we drive 20 minutes to Pisgah Inn where we would be able to buy a map.  Once we reached the Pisgah Inn, the guy gave us a crappy little black and white drawing of something that resembled a map which featured Frying Pan Mountain Lookout tower.  Yeah, I heard of the tower, but even with the map, we, I mean me, the leader, lead us down a road to a sewage treatment facility. Oh crap. My Dad did question our destination a few times by saying stuff like: shouldn't we be going up and not down?  shouldn't we be on a gravel road not a paved road?  My response was, "Where is your sense of adventure?"  (And you know the steep climb back was grueling but I was not about to complain and I had to fake my optimism.) After giving up being the leader, yeah, I know when it is time to turn the reigns over to a competent person, we followed my Dad's advice and drove further along the Blue Ridge until we found the gate that said," Frying Pan Mountain Look out Tower......which was also visible from the road and sitting high up on the mountain.  Once we proceeded on the gravel road there was a split, Oh my!, and my Dad asks me; which way should we go?  I said,  I don't know, but left looks like the right way to go.  After hiking a 1/2" mile, we hear gun shots.......my Dad stops in his tracks and says that is a semi automatic. Living in the country, I am so use to hearing gun shots that it doesn't freak me out and I simply state that there is private property surrounding the area....so it is probably someone shooting a gun.  Besides, after about 6 miles of hiking already I was determined to make it to that Tower, even if I had to go past someone carrying a semi. Eventually, we see the tower above us, and we were home free.  My Dad did question the "No trespassing sign", but I didn't think twice about it....who was going to come out there and ticket us? Check out the tower.  
Look above my finger that is the tower

        Side story: Once we reached the tower I heard vehicles.  I figured it was forest rangers (maybe they were going to get us for trespassing)  until I saw about 6 guys get out of some ATVs and take photos.   Yeah, these beautiful men, and I say this seriously, were out taking photos of the view.  Yeah, they were too beautiful to hike up to the tower and hired vehicles to get them there.  Once we came down the tower we heard them crying about how cold it was up there and that the tower was moving.  Although, one guy took a photo of my Dad and me and I find that so sweet to think there is a photo flying around on the internet of us two together....surviving the tower.

Charlie on the tower

   
     I am holding on for dear life:

50 mile in hour wind hair do
       Some things you should know if you decide to hike to Frying Pan Mountain tower.  The gravel road which leads to the tower is located off the Blue Ridge Parkway near Pisgah Inn and it is visible from the road. (No need to wonder aimlessly through other areas of the Parkway, especially near a sewage treatment facility)  Wear pants, cause it is a lot cooler / colder at the top of the tower.  The tower is 70 feet tall and is on top of 
5, 340 feet mountain. The tower is made to move with the wind, so you will be moving with the tower too.  Although it feels like you and the tower will fly away........it is safe.  I can say this now cause I made it down safe and sound.  Have a sense of humor, cause no one can tell you where it is and the map may not get you there either!


Where is the View?


Wednesday, May 7, 2014

To get out of a funk....sew up a new dress

      A couple of weeks ago I fell into a funk, and I really needed a distraction.  So, I tell my girlfriend, we need to go out and have some serious girl talk over bad food and wine. I  knew just the place.......downtown's  Asheville Pizza and Brewing.   To make it challenging, I decided to design and sew up a new dress in one week.  In addition, I had to use fabric from my stash...yeah, the husband has me on fabric lock down. (bummer). Of course, my friend would have to take photos of me wearing the dress so I could post them on this blog.............And that is exactly what I did.


      The fashion fabric: a cotton voile I purchased a year ago.  Once the fabric arrived,  I  couldn't envision myself wearing the bright floral print.  ( Like I told my Mom, I must have been really happy when I decided to buy it! ) Anyway, with the warm weather here finally, I decided to commit to sewing a dress using the bright floral and no matter how tacky I would look, I would wear it out....besides where we were going, I doubt anyone would recognize me.  HA!  Check out the dress: 


A little windy, trying to keep that dress down

     The design process:  I knew I wanted a simple easy to wear play dress, and I wanted to break up all the fabric floral pattern.   Also, I really needed to use a sloper, cause seriously I have no idea how to design a dress from scratch.  I ended up using Vogue's peplum bodice since I had already adjusted the bodice pattern, and altered the neckline.  I think a princess seam bodice would have been just as lovely. I decided to pleat the skirt to break up the floral print, and once I decided on the length......I just had to get to ironing and pleating. Oh, I did sew the inside of each pleat to help keep the pleats from coming unfolded. 

Again with the wind!


       Underlining and lining:  sewed up the bodice fashion fabric and followed suit for the bodice lining fabric. I used my standard pencil skirt pattern for the lining of the pleated skirt fashion fabric; which I basted together along the waist. I felt if I pleated the lining too........my hips would end up being 4 times the size they already are, and what woman wants that!  Also, I did a narrow hem for the skirt lining, and I did a bias tape, under stitch hem for the pleated skirt. Please note: I hemmed the skirt first before tackling the pleats.  I underlined the sleeve; which is to say, after cutting the floral fabric and lawn fabric I hand stitched /basted them together.  Once that was done, then I treated the two pieces of fabric like one piece of fabric.  

Lining and bias tape hem 


     Sewing process: Sewed using French Seams and bias tape for Hong Kong seams. Sewed Stay Tape along the neckline and zipper seam on both the fashion fabric and lining fabric.   Hemmed the skirt and then pleated. Sewed the lining of the skirt and attached at the waist.  Sewed the fashion fabric bodice to the skirt.  Attached a 20" invisible zipper.  Then I machine sewed the bodice lining to the fashion fabric bodice.  I used Christine Hayes method for the Emery Dress  What a great help!  Then I did a catch stitch at the waist attaching the bodice lining to the skirt. 


Drinking Sangria........it was really good!


    Thanks Dana for the great photos!