Check out my Pages

Tuesday, August 18, 2020

Studio curtains please

 The studio is coming along nicely.  Currently I have been sewing curtains for my windows.  I really wanted to sew up something non-fussy...............So this is what I came up with.  

Quilted cotton with a floral pattern.  Check it out:


Next up:  To sew a chair cushion in a quilted cotton with a different pattern.  I plan to make my own piping.  


Lastly, here is a link to my most recent How to video titled:  "Paper Cut Out Collage".  Enjoy


https://drive.google.com/file/d/1xPD3SB5kQykpYTgrv7u8WpqFlpN4q6tI/view

Monday, August 3, 2020

Mosquitoes, please stay out of my studio

New Orleans is famous for so many fun wonderful things, but also the dreaded mosquitoes.  Rain can pop up anytime.  You may be out and the skies are blue and out of nowhere a downpour.  So it is not surprising that we have a lot of mosquitoes.  

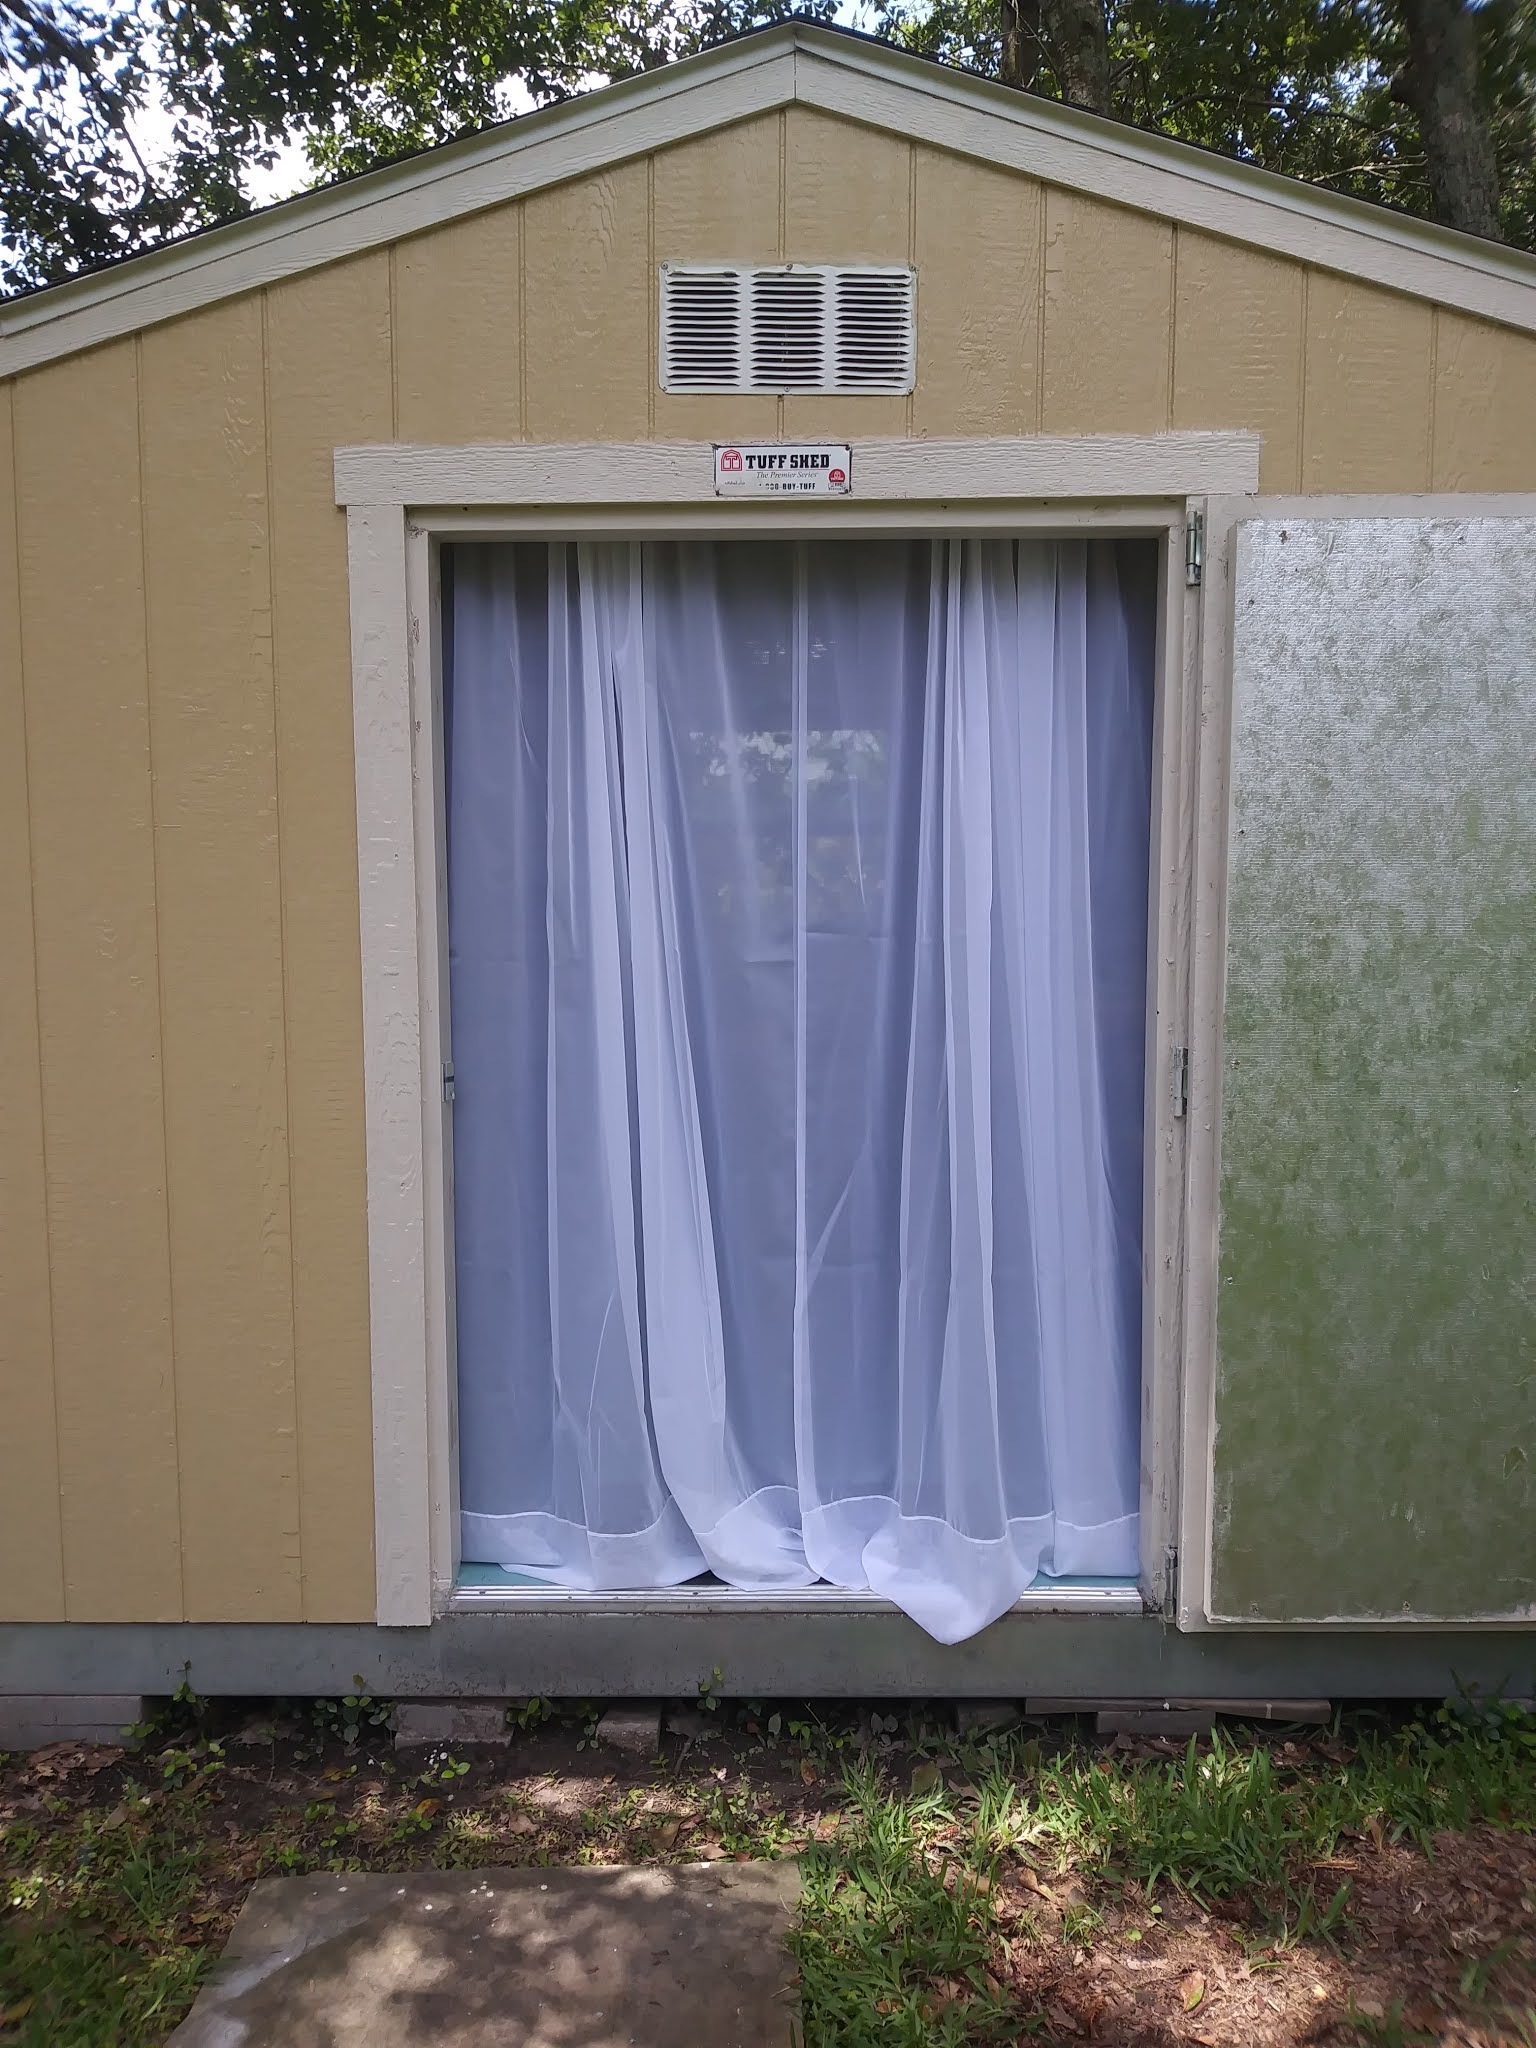
Since the studio does not have any air conditioning, it is important for me to keep the main door open for air flow; which also is a welcome mat for mosquitoes to come in.  Bummer.  

My solution, sheers hung inside the door way.   I was fortunate to have some extra sheers stored in my closet, for a project I decided against.  

I wasn't sure if the sheers would keep the mosquitoes out, but they actually work.  Check it out:


Outside view


Inside view with my little dog Nola. 


I left the sheers open for this photo but I usually keep them closed while in the studio. 

Maybe this will help someone who is suffering from mosquito bites too. 

Stay healthy and safe.

Christin 


Monday, July 20, 2020

Looking like an Art Studio

    So for the past couple of months I have been pushing myself to make an art studio a reality.  I have had art supplies and paintings stored away in boxes for the past five years and finally I reached a point where I could unbox my treasures and put them on display.  ( With only 4 more boxes to unpack, my goal feels obtainable.)   To me there is a little light shining through these unusual times.  

Since my husband now works from home.....my studio desk turned into his work desk.  Bummer.  So with a very slim budget and with my little pick up truck, it was time to hunt down some trash finds.  Yes, you can always count on the end of the month for people to put furniture out on the side of the road for trash pickup.  I ended up scoring three nice finds:  a sewing table with sewing machine, a small shelving unit and a rolling cart.  

I removed the sewing machine, lightly sanded and cleaned the table.  Prepping is important for re-purposing furniture.  Then I spray painted the table with Rustoleum painters touch 2x.  Paint and primer.   I love this stuff.  Easily applied and goes on smoothly.  Anyway, I did the same prep work for the rolling cart and shelving unit.  To dress up the small shelf unit I did decoupage the back with decorative paper.  It came out ok. .....a little wrinkled but for the studio......I am fine. For decoupaging I used white glue mixed with water and brushed it on.  Of course I sprayed it with a final clear coat for protection. 

Check it out. 


Looking Like an Art Studio.  The sewing table is to the left. I painted it off white and added bird pull handles which I painted with the same off white.


Check out the decoupage shelving unit:


Shelving Unit with decoupage.  Spray painted off white and used decorative paper.  Rolling cart to the right was spray painted vintage blue.  The cart holds my small printing press.


Oh, I completed another how to (drawing) video.  This one is GLITTER YOUR MANGA CHARACTER.  I thought it would be fun to add glitter to a manga character I created.  I think the kids will like it.  Some lessons I learned.  Vimeo lets you posts your video for free as long as you don't go over the 500 mg once a week.  So the first video I did was 504 mg and I naively thought they would post it.  Well they did for a second and took it down.  So now I know before posting make sure it is 500 or less.  Also, I figured out that my videos can be about 4 minutes and stay below the 500 mark.  This is good to know, so that if I see my clips are too long then I can edit them smaller before turning them into a mp4.  

Here is the link: (will have to update in about a week)

Ok, so if you go over your weekly limit for Vimeo they do not release it the following week.  Instead they lock your video unless you pay for upgrade.  Lesson learned.  So I uploaded my video to my Google drive and then made the link viewable to everyone.

Without further delay, Glitter Your Manga Character How to video:


 Also, here is the first video, How to Make an Abstract Watercolor.  So I went ahead an uploaded it to my Google Drive since I deleted my Vimeo account.


 Stay healthy and safe,

Christin

Wednesday, July 1, 2020

How to paint an abstract watercolor video

Anyone who is looking to make an online video may appreciate Hitfilm Express.    Since my work schedule is a little more flexible these days.....I thought I would try my hand at making a how to video.   A lot of questions came up, such as:  how to add music, how to edit the video, etc.   Fortunately I stumbled upon Hitfilm Express; which is an open source free software.  The software is what you do to put all the magical steps together and export your film into vimeo or you tube, etc. 

Also, I wanted this video to be family friendly.  Maybe a parent will want to create an abstract watercolor along with their child.

Of course you can upgrade and purchase add ons from Hitfilm Express, but I made my how to video with the basic free version.  Also, I googled royalty free music, and downloaded it into the Hitfilm express program.  Lastly, I created a vimeo account.   My video size was small enough to keep it free. 


So, without further ado, here is my first how to create an Abstract watercolor  

Enjoy

Monday, June 22, 2020

Studio in the Works

First and foremost, I hope everyone is staying healthy and safe. 

5 years in the making..... but I am happily working/sweating on creating a working studio space.   Having a studio space to paint really wasn't a necessity for me. I was fine with using our dining room table for a painting area.  When we would have friends or family over, I would simply put away my meager supplies.  However, a few months ago, when work invaded my dining room table re: studio space,  something had to change. 

We purchased a tuff shed as soon as we realized our garage, which is attached to our house would flood.  Yeah, we knew that the concrete was old and cracked  in our garage, but it wasn't until a few months after buying our 60 year old house did we find out that water would come up from the cracks.  I think we should have had a clue when we would see frogs jumping  out of the cracks....for real.   Oh well.

Recently we had windows installed in the tuff shed.  Since I work with oil paints, I really need ventilation of course having natural light too.

Check out what I have done so far:  I cut the bead board paneling for this wall.  I actually used soffit which is a roofing material.  I put a coat of paint to test the color.  Eventually the studs will be painted the same color.  I am kind of going for a shabby chic look.

Cut bead board paneling


Here is a photo with the 2 x 4 shelves nailed into the studs.  The shelves are what holds the paneling in place.  Also, I primed and painted the floor with a country blue oil based paint from Sherman Williams.   The color is called Drizzle......it reminds me of the rain.  Also, this was left over paint from our kitchen cabinets. 

check it out: 
I love the floor

Other updates:  I have been sewing....but I have been really bad and not blogging.  I am half way through my children's story book illustrations.   And if that was not enough, I am currently writing a youth novel......however, my best girlfriend is helping me with it.  Yeah we social distance outside on her back patio every two weeks and basically she tells me everything bad about the book.  Which is truly a great friend! 

Happy returns,

christin


Monday, October 7, 2019

Fun furry paws and ears

         Halloween is quickly approaching and my thoughts are on a small play that I will be performing on Halloween evening.  Really, it is more like taking story time and making it come alive with costumes, props, and a little bit of singing.  (It should be all of 30 minutes.)

         The story is  Grimm's  "Little Red Riding Hood."  So my co-worker will be the wolf and since we are on a budget, and I can sew.........I said I would make the wolf ears and paws.  Easy enough I thought.  Ha!  Considering I never have sewed with fur before!

        Love the internet..........there are lots of wonderful tutorials on making fur paws and ears.  I found a very helpful website called Matrices.net

       She has a free paw pdf pattern.......easy enough to download.  Also, she has step by step clear instructions.  (Awesome)  So, the paws were really easy to make, but the fake fur is harder to sew with.  Make sure you use a heavy duty needle.  I sewed the paws on the sewing machine along with the paw felt pads.  No need to zigzag the felt....I just used a regular top-stitch. Also I used thin black foam to cut out paw claws, just remember to sew them with the  pointed edge facing paw pads before you sew paws right side together. To finish off the edge of the paw gloves I used a scrap of black bias tape.  Check it out: 
Wolf Paws


       For the ears, I looked on the internet for a ear pattern.  Please note:  I printed out a pattern that looked like a good size.  I wish I would have held it up to my headband.  They came out a bit large, but I think for a goofy wolf it works.  In the future I think I may make the ears smaller.   The ears were a little more work.  After sewing right sides together, and turning out,  I hot glued black foam on the inside so ears will stand up straight.  I hot glued the pink felt  and another piece of fur on top to cover the bottom felt edge.  Then the ears were hot glued to the headband. Check it out: 
Wolf Ears


      Materials:  I purchased a yard of fake fur which is enough for paws and ears.  I think I have enough to make a tail if I feel up to it.  1 piece of black felt for the paw pads and 1 sheet of pink felt for ears. A scrap of black bias tape to finish the edge of the paws. 1 sheet of thin black foam for paw claws.  Also, a headband for ears and hot glue.   Time:  Around 4 hours for the paws and 3 hours for the ears.  (Could be quicker but I took my time....since I really didn't know what I was doing. )

Check it out: 
Wolf, coming out of the bushes

Check out the wolf claws 


 I hope this was helpful. Happy Halloween to all! 


Monday, May 20, 2019

Manga Madness

    Creating oil paintings haven't been in my reality for a few years now.  Studio renovations are still in the works, so my only option has been creating with less toxic materials.  Watercolors, acrylics, pencil and markers have been a life saver.  Granted I am not painting exactly what I want too, but none the less art is getting produced on the dining room table! 

    Mainly I have been focused on the illustrations for my children's story book.  I didn't realize how long this would take, but it is real easy to draw and watercolor an illustration only to show it to my husband and he comes up with a better idea.........so I start over.   This little book has been dear to my heart so I want it to be perfect.

  Eventually I will share the illustrations but for now I am guarding them.......but I will share another project............Manga Madness.   

  Personally, you all should know that I am not an illustrator.   I like more loose organic lines, yet I find myself working on this Manga program for work.  In order for me to help other people create a manga, I thought it was important for me to create a character and story line.......that way I can walk other people through the steps.

    So here goes nothing, Let me introduce you to:  "Meesha the Ninga Librarian".   Yes, that is a book for a hair do!  I have learned that Manga characters have unusual hair dos and their eyes are pretty large.  The characters tend to be show lots of emotions in their drawings.  Any who......the story line here is simple.  Meesha lives in a big city where crime is rampant........yet she is able to protect herself by the throwing the book she carries.  It comes back to her like a boom-a-rang.   I wanted to keep the story short and sweet although you will meet other characters...............not quite sure how I will develop them.   Check Meesha out.


"Meesha the Ninga Librarian" 


As I update the story, I will totally share this manga with you all.